
|
|
#21
 04-18-2014, 12:48 PM
|
||||
|
||||
|
There is a scale update drawing to the Redstone LV fins (which of course I cannot bloody well find!), and there was a LC finset which was a Semroc product with a smaller fin area for scale appearance. The finset which I have uses three balsa parts for the Fin/Air vane and a plywood plate for the fin tip.
Perseverance wins. By the way, if you choose to do so, use the lower fin outline to cut from. The upper is drawn with the fillet in place.
__________________
Gravity is a harsh mistress SAM 002 NAR 91005 "The complexity of living is eminently favored to the simplicity of not." Last edited by jharding58 : 04-18-2014 at 01:50 PM. 
|
|
#22
04-18-2014, 03:06 PM
|
||||
|
||||
|
Quote:
I'm having a real hard time wrapping my head around that fillet. Anybody have a clear, close in, photograph of the old Centuri fins? Thanks Jim .
__________________
. . Dreaming of making the rockets I dreamed of as a kid (and then some). "The Guide says there is an art to flying", said Ford, "or rather a knack." "The knack lies in learning how to throw yourself at the ground and miss." Launching is Optional... Landing? That Depends on Trees.
|
|
#23
04-18-2014, 03:08 PM
|
|||
|
|||
|
Many Thanks, Jh! I see there is a pattern for the end plate....i need it! Just finished rough cutting the fins and the tabs.....mine are stretched a little....being of average skills(and patience) ill settle for close enough.....that drawing will make a great reference when im ready to shape the fins!
|
|
#24
04-18-2014, 03:33 PM
|
||||
|
||||
|
Quote:
I would suggest examining one of the many Redstones on display or getting the Glencoe Jupiter C kit. Nothing beats seeing it in 3-D. Bill
__________________
It is well past time to Drill, Baby, Drill! If your June, July, August and September was like this, you might just hate summer too... Please unload your question before you ask it unless you have a concealed harry permit. : countdown begin cr dup . 1- ?dup 0= until cr ." Launch!" cr ; Give a man a rocket and he will fly for a day; teach him to build and he will spend the rest of his days sanding...
|
|
#25
04-18-2014, 03:35 PM
|
||||
|
||||
|
Quote:
Good Plan.. My Glencoe is long lost... But I did find this: 
__________________
. . Dreaming of making the rockets I dreamed of as a kid (and then some). "The Guide says there is an art to flying", said Ford, "or rather a knack." "The knack lies in learning how to throw yourself at the ground and miss." Launching is Optional... Landing? That Depends on Trees.
|
|
#26
04-18-2014, 06:12 PM
|
||||
|
||||
|
Doing justice to the fin fillets takes a little bit of work. The K-21 fins cheated a little in that the fillet was glued to the fin and then implied itself on the airframe. The actual fillet resembles that of the V-2, relatively deep at the trailing edge. The 1/12 scale build from 2002 shows the depth to good effect, as does the image from USSRC (which has a pretty amazingly well maintained MR).
http://www.accur8.com/NARAM44_LibertyBell.html The end view of the K-21 instructions (4th pane) shows the suggested level of fillet and curvature viewed from the tail. Imagine a piece of coving sanded at a very sharp angle laid in between the fins. The fillet begins at the point of intersection of the fin chamfer with the tube and runs down to the end of the tube spanning from the fin to the tube, but a greater distance over the lower end as the tube curves away from the fin root while the fin surface does not. This is the trapezoid you see in side elevation of the fin can. http://www.spacemodeling.org/jimz/k-41.htm
__________________
Gravity is a harsh mistress SAM 002 NAR 91005 "The complexity of living is eminently favored to the simplicity of not."
|
|
#27
04-19-2014, 12:06 AM
|
||||
|
||||
|
Quote:
I cannot find the picture but I crawled underneath one once and took a shot which clearly showed the shape of the fillet. Bill
__________________
It is well past time to Drill, Baby, Drill! If your June, July, August and September was like this, you might just hate summer too... Please unload your question before you ask it unless you have a concealed harry permit. : countdown begin cr dup . 1- ?dup 0= until cr ." Launch!" cr ; Give a man a rocket and he will fly for a day; teach him to build and he will spend the rest of his days sanding...
|
|
#28
04-19-2014, 09:03 AM
|
|||
|
|||
|
A little bit more...laminated the main fins, built a motor mount.......!
|
|
#29
04-20-2014, 12:26 AM
|
||||
|
||||
|
Using centering rings, body tube, and an engine hook from Semroc, I created a ST-9 to ST-20 motor mount for a 24mm x 95mm motor. I gave the masking tape a coat of glue to prevent it from coming undone in the future.
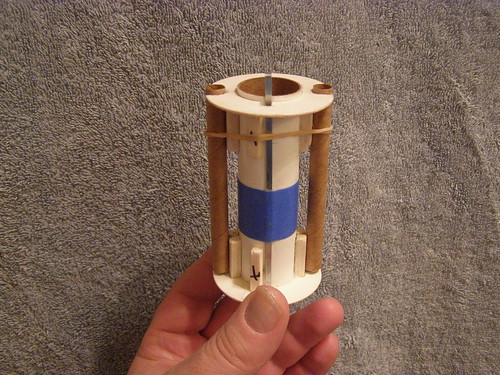 I glued scraps of 3/16" (square) balsa stock to act as a gusset, and to guide the 1/4" (ID) launch lugs from Sunward. These launch lugs will be used to attach supplemental fins to the Jupiter C (or Estes Mercury Redstone (1921)) To keep the supplemental fins aligned, I will cut small lengths of dowel at an angle then glue them inside the launch lugs at the upper end of the lug. The matching angle will be on the dowels used to attach the fins, thus they will be locked into the correct orientation. 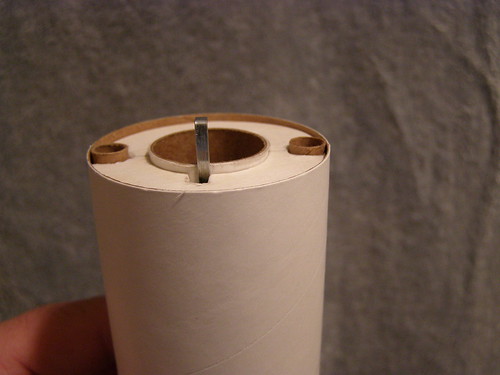 I plan on gluing the lugs slightly raised from the aft centering ring to prevent fillets from clogging them. As I mentioned before, this was inspired by Dr. Zooch, and Estes' Mercury Atlas
__________________
. . Dreaming of making the rockets I dreamed of as a kid (and then some). "The Guide says there is an art to flying", said Ford, "or rather a knack." "The knack lies in learning how to throw yourself at the ground and miss." Launching is Optional... Landing? That Depends on Trees. Last edited by K'Tesh : 04-20-2014 at 01:13 AM.
|
|
#30
04-20-2014, 08:46 AM
|
|||
|
|||
|
Very nice work on the motor mount! The epoxy had just cured on mine, and lo and behold...the mailman pulled up with a brand new body tube and decals from the GREAT SANDMAN!!
 Needless to say, the MM is in the BT...for good! Now things will slow up for me as i need to start shaping the fins.....i have to take my time or ill screw 'em up! Needless to say, the MM is in the BT...for good! Now things will slow up for me as i need to start shaping the fins.....i have to take my time or ill screw 'em up! ")
|
 |
| Thread Tools | Search this Thread |
| Display Modes | |
|
|


 Linear Mode

